Path Extend the storage location in Mass in the SAP:-
Malik SAP Solutions
Malik Info Solutions is a Professional blog.Here we features Tips and Tricks related to SAP software and traininigs.
Saturday, May 15, 2021
How to extend the material storage location in the mass
Error schedule agreement at line item already exist solution
Path To resolve the schedule agreement issue SAP:-
How to maintain the material code for purchasing
👉 Path To resolve the issue in material master:-
Error:- 👇
Step 1:- Use the Transaction code = MM01. after entering the material code press enter and select the highlighted filled showing below screenshot.
Step 2:- Click on the org level and select the view and hit the enter.
Material is not maintained in the plant
-:Material is not maintained in the plant:-
Step 1:-Use the transaction code :- MM01 and follow the below steps by steps.
Step 2:-After entering the field of plant and location press enter.
Step 2:-In mandatory tab fill the purchasing group and GR processing time and HSN/SAC code in the Foreign trade import data, profit center, valuation class, cost center etc. and than saved.
Now the material is maintained in the plant.
Monday, September 28, 2020
how to do Configuration of sap MM
Assign Fields to Field Selection Groups:-
This configuration allows one to make some fields optional, hidden, or mandatory in the master record. Follow the steps given below to set this configuration.
Path to Assign Fields to Field Selection Groups
IMG ⇒ Logistic General ⇒ Material Master ⇒ Field Selection ⇒ Assign Fields to Field Selection Groups
TCode: OMSR
Step 1 − On the Display IMG screen, select Assign Fields to Field Selection Groups by following the above path.
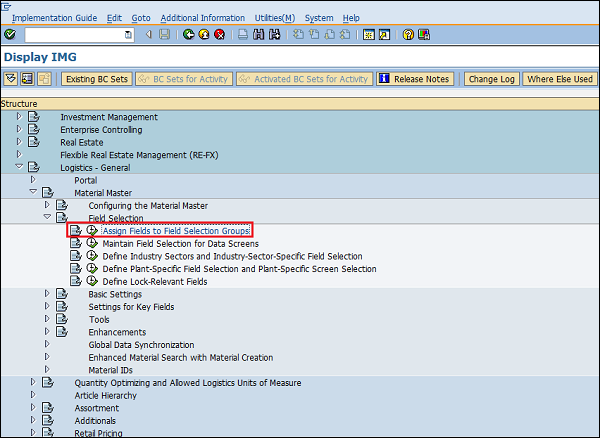
Step 2 − Select the entry.
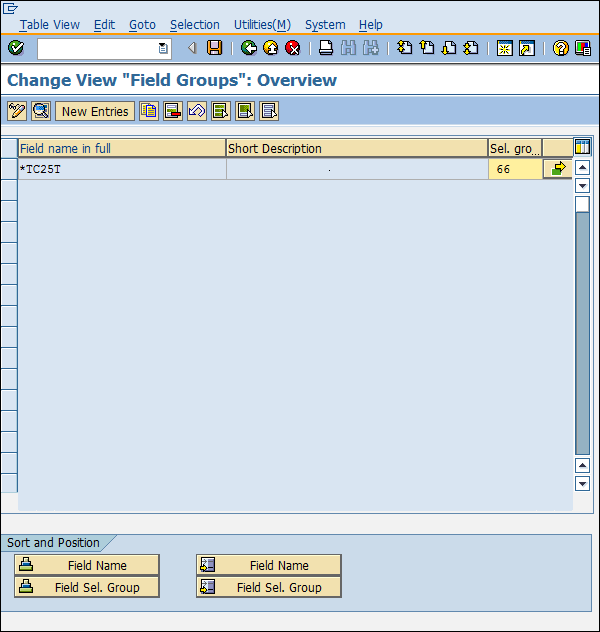
Step 3 − If you wants you can change the properties of the fields as hidden, display, required entry, or optional entry. Click on Save. Field Groups are now set with the desired field entries.
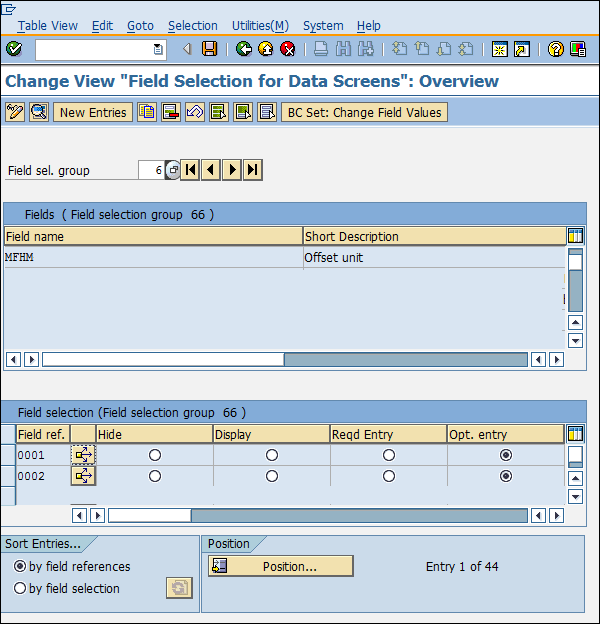
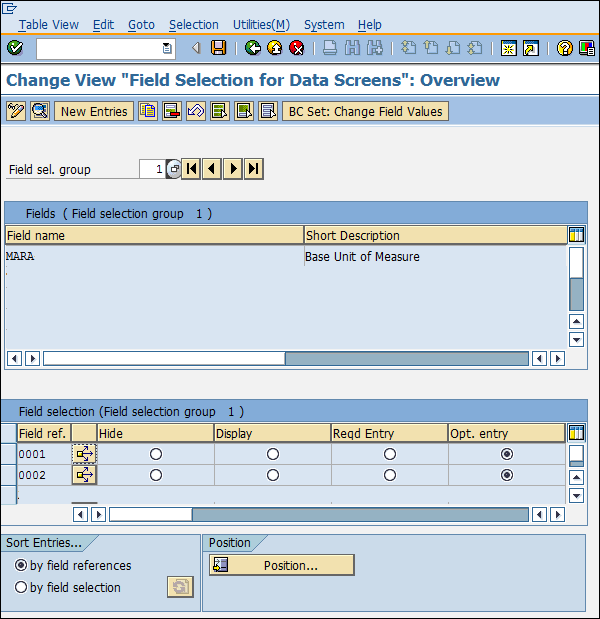
Maintain Field Selection for Data Screens:-
This configuration allows one to make some data screens in the master data as optional, hidden, or mandatory. Follow the steps given below to set this configuration.
Path to Maintain Field Selection for Data Screens
IMG ⇒ Logistic General ⇒ Material Master ⇒ Field Selection ⇒ Maintain Field Selection for Data Screens
TCode: OMS9
Step 1 − On the Display IMG screen, select Maintain Field Selection for Data Screens by following the above path.
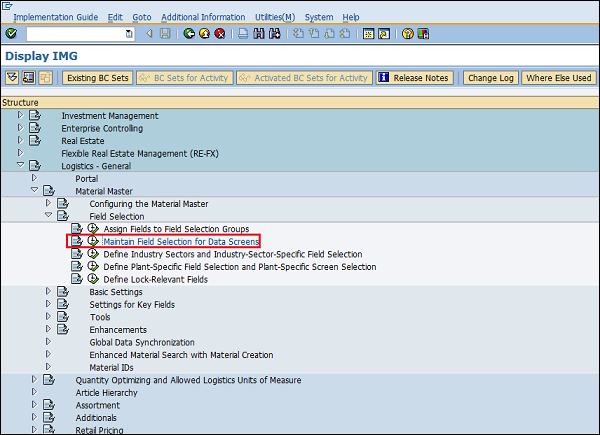
Step 2 − Select the field selection group in which you want to make changes. Here you can make changes in the field reference as hidden, display, required entry, or optional entry. Click on Save. Field selection for data screens is now maintained.
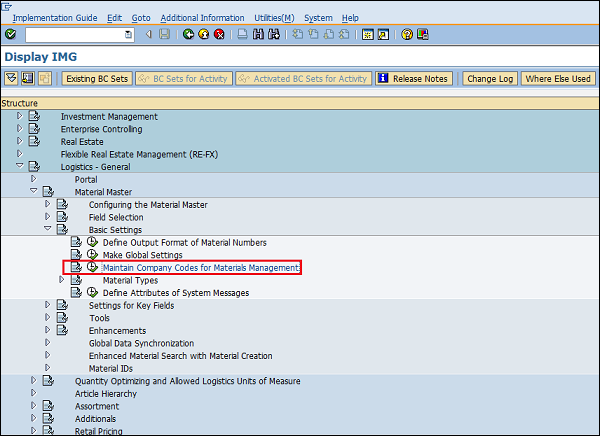
Maintain Company Codes for Materials Management
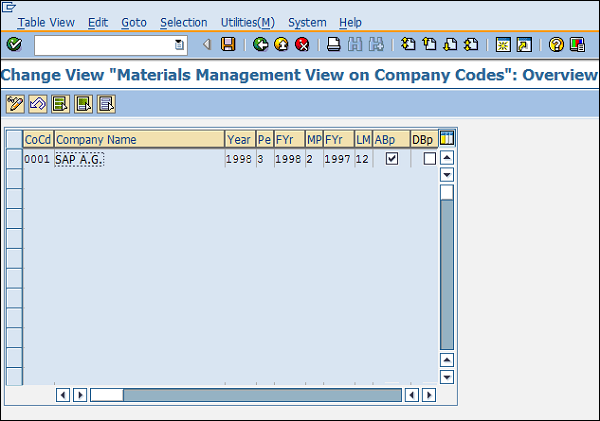
This configuration allows one to maintain company codes with a period along with the fiscal year. Follow the steps given below to set this configuration.
Path to Maintain Company Codes for Materials Management
IMG ⇒ Logistic General ⇒ Material Master ⇒ Basic Settings ⇒ Maintain Company Codes for Materials Management
TCode: OMSY
Step 1 − On the Display IMG screen, select Maintain Company Codes for Materials Management by following the above path.
Step 2 − Provide details such as name, company code, along with the fiscal year and the period for that. Click on Save. Company code is now maintained for materials management.
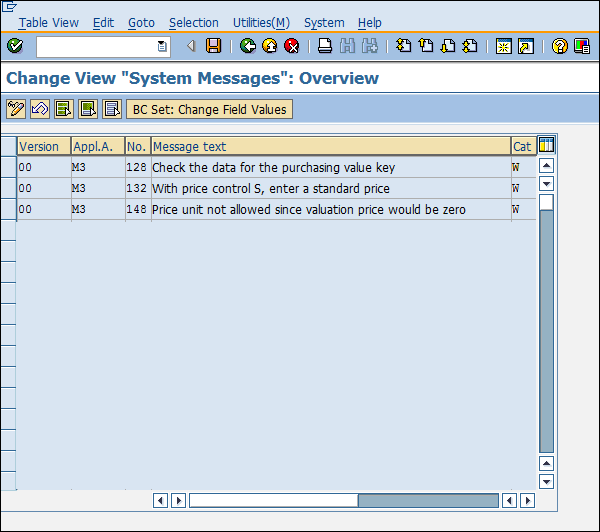
Define Attributes of System Messages
Sometimes the system does not allow us to save a document when its information is incomplete. In such cases, the system issues some messages to indicate the probable cause of error. These system messages can be set up by following the steps given below.
Path to Define Attributes of System Messages
IMG ⇒ Logistic General ⇒ Material Master ⇒ Basic Settings ⇒ Define Attributes of System Messages
TCode: OMT4
Step 1 − On the Display IMG screen, select Define Attributes of System Messages by following the above path.
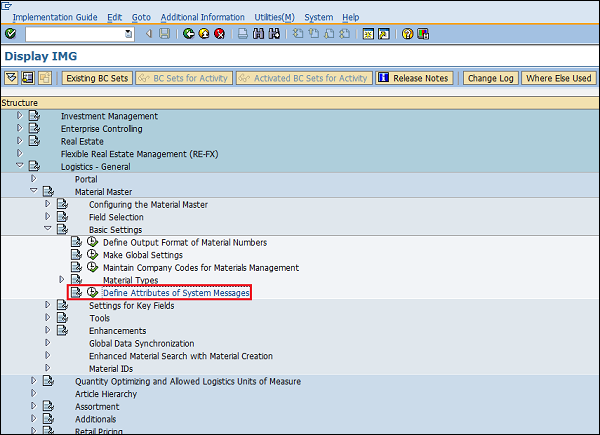
Step 2 − Here you can maintain type of message (warning or error), message number along with the description of message. Click on Save. System messages are now maintained.
Define Number Ranges – Purchase Requisition
When we create a purchase requisition, every requisition is recognized by a unique number that is known as the purchase requisition number. We can define a number range manually, otherwise the system can automatically assign the same. Follow the steps given below to define a number range for purchase requisition.
Path to Define Number Ranges
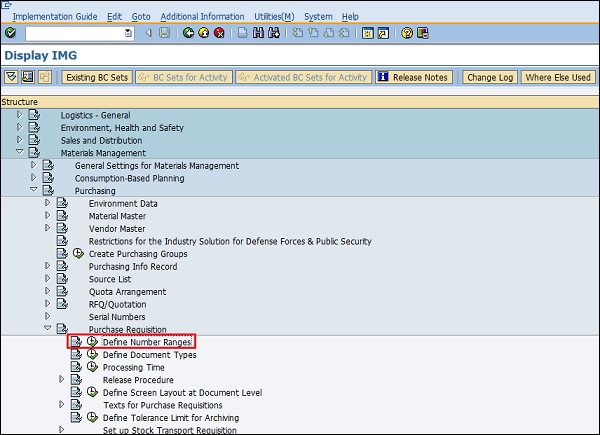
IMG ⇒ Materials Management ⇒ Purchasing ⇒ Purchase Requisition ⇒ Define Number Ranges
TCode: OMH7
Step 1 − On the Display IMG screen, select Define Number Ranges by following the above path.
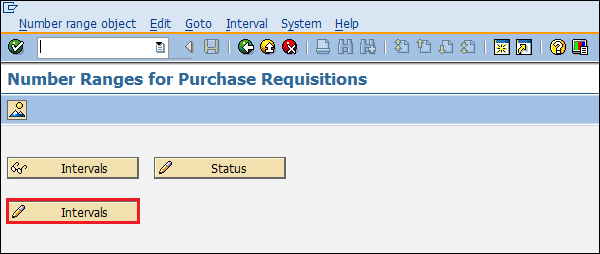
Step 2 − Select edit mode of Intervals tab.
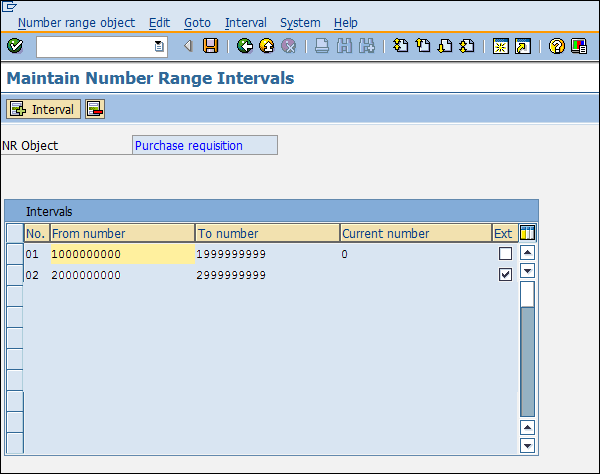
Step 3 − Here you can maintain a number range accordingly. Then click on Save. Number range for purchase requisition is now maintained.
Define Document Types - Purchase Requisition
Different types of documents are created for purchase requisition. Follow the steps given below to maintain document types for purchase requisition.
Path to Define Document Types
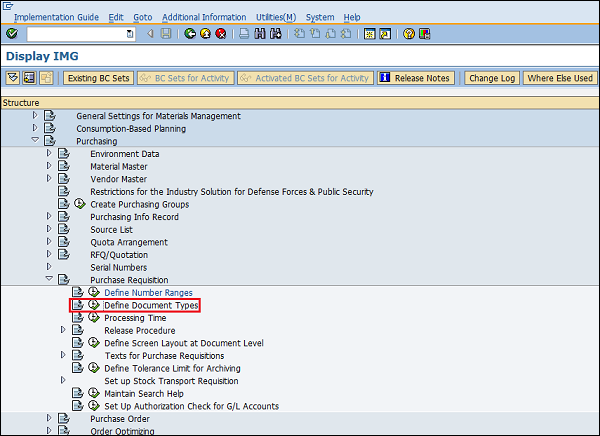
IMG ⇒ Materials Management ⇒ Purchasing ⇒ Purchase Requisition ⇒ Define Document Types
Step 1 − On the Display IMG screen, select Define Document Types by following the above path.
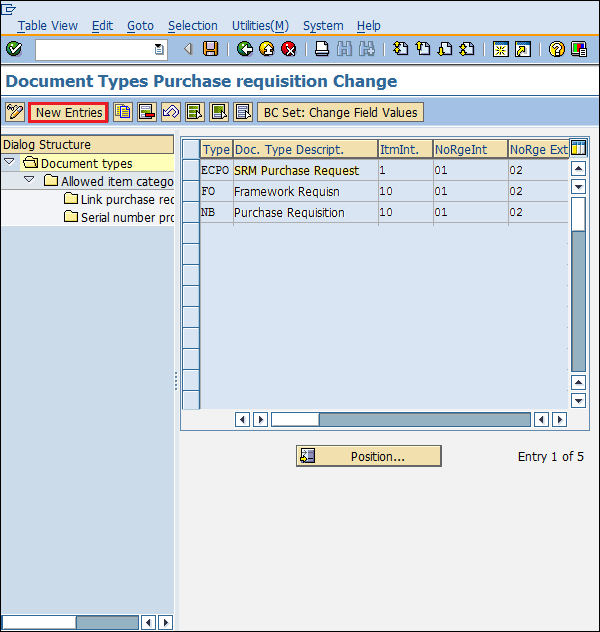
Step 2 − Click New Entries.
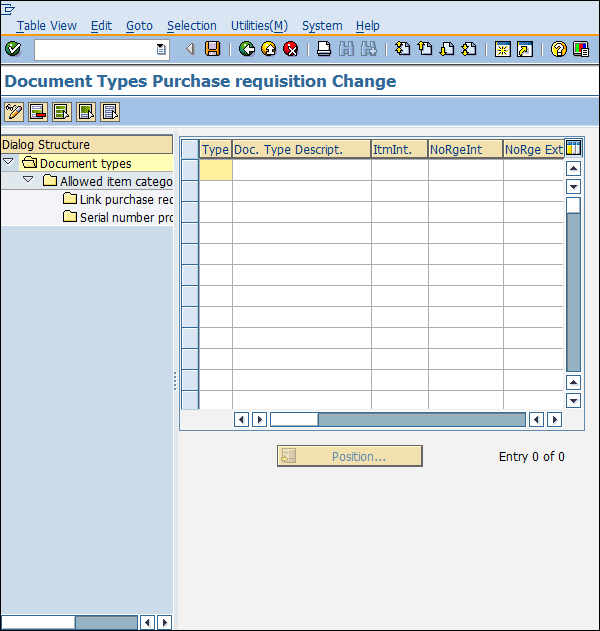
Step 3 − Provide details such as the name of the document type with its description. Click on Save. Document types for purchase requisition are now defined.
Define Number Ranges – RFQ/Quotation
When we create RFQ/Quotation, every quotation is recognized by a unique number known as quotation number. We can define a number range manually, otherwise the system can automatically assign the same. Follow the steps given below to define a number range for RFQ/Quotation.
Path to Define Number Ranges
IMG ⇒ Materials Management ⇒ Purchasing ⇒ RFQ/Quotation ⇒ Define Number Ranges
TCode: OMH6
Step 1 − On the Display IMG screen, select Define Number Ranges by following the above path.
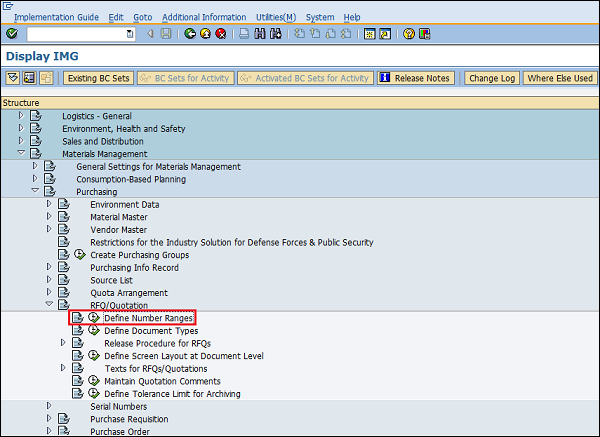
Step 2 − Select edit mode of Intervals tab.
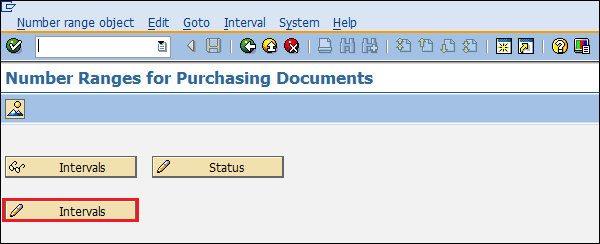
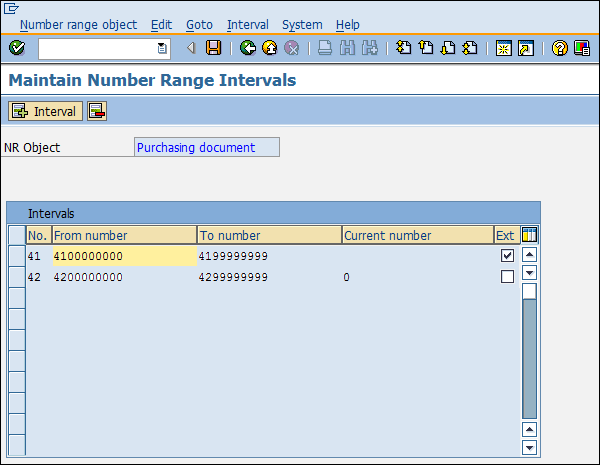
Step 3 − Here you can maintain a number range accordingly. Then click on Save. Number range for RFQ/Quotation is now maintained.
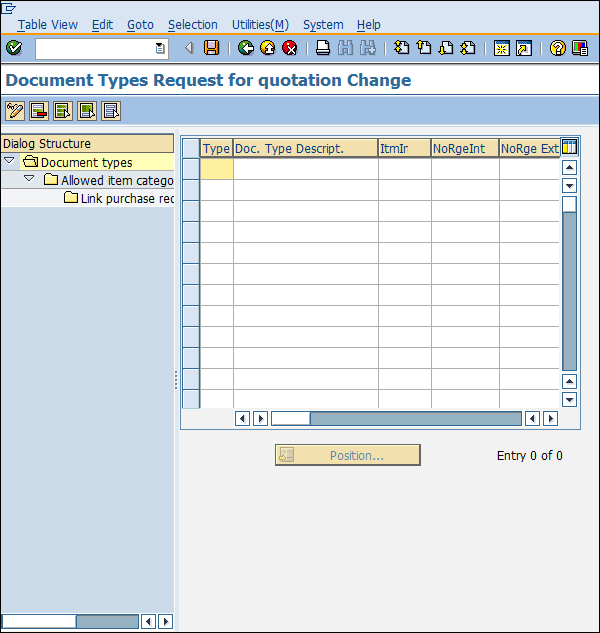
Define Document Types - RFQ/Quotation
Different types of documents are created for RFQ/Quotation. Follow the steps given below to maintain document types for RFQ/Quotation.
Path to Define Document Types
IMG ⇒ Materials Management ⇒ Purchasing ⇒ RFQ/Quotation ⇒ Define Document Types
Step 1 − On the Display IMG screen, select Define Document Types by following the above path.
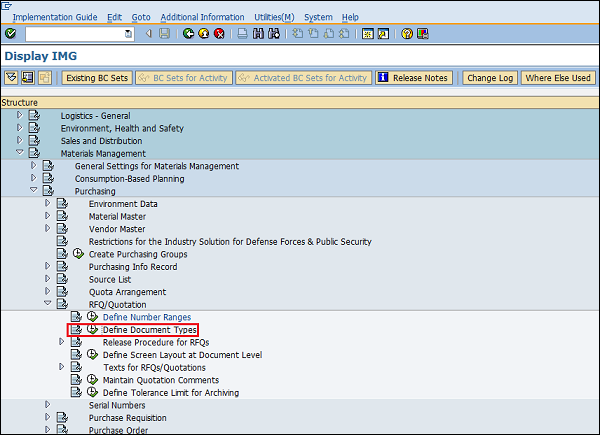
Step 2 − Click New Entries.
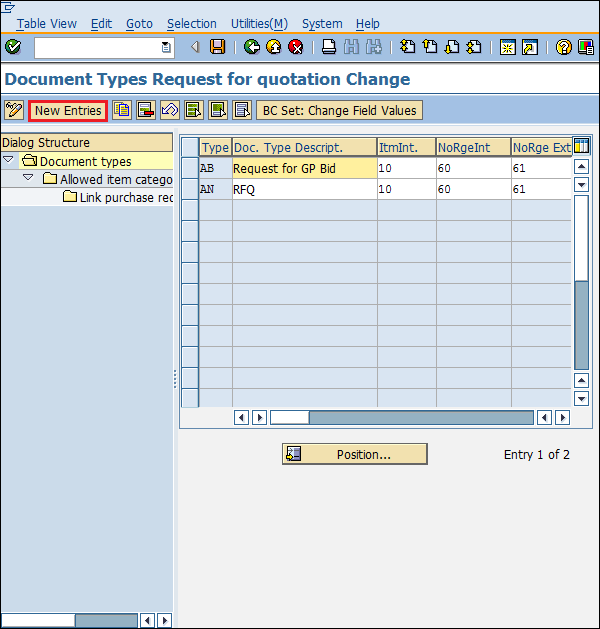
Step 3 − Provide details such as document type with its description. Click on Save. Document types for RFQ/Quotation are now defined.
How to create the service entry sheet
Service Entry Sheet:-The service entry sheet is used to record services as they are actually performed by the vendor or subcontractor. In the case of planned services, the services actually performed are recorded in the entry sheet with reference to the specifications already entered in the PO.
Path to Create Service Entry Sheet
Logistics ⇒ Materials Management ⇒ Service Entry Sheet ⇒ Maintain
TCode: ML81N
Step 1:-select the Maintain execute icon by following the above path or Execute the TCode given above.
Tuesday, September 22, 2020
How to create service master data
Service management are following 3 types:−
👉Service Master Record
👉Service Purchase Order
👉Service Entry Sheet
Path to Create Service Master Record:-Logistics ⇒ Materials Management ⇒ Service Master ⇒ Service ⇒ Service Master
TCode: AC03
Step 1:- Click on the create the new service and fill the mandatory field.
Service Purchase Order:-A service purchase order or a service order is a formal document from a buyer organization to a supplier to procure services provided by the supplier. Service orders provide a basic process to procure services that can have a planned or unplanned nature of work. In a service procurement workflow, a service order is created after a service requisition is fully approved.
Path to Create Purchase Order:-Logistics ⇒ Materials Management ⇒ Purchasing ⇒ Purchase Order ⇒ Create ⇒ Vendor/ Supplying Plant Known
TCode: ME21N
Service Category: D for service.
Step 1:- Execute the Tcode ME21N
Step 2:- After filling the details given in the screenshot click the save button.
How to extend the material storage location in the mass
Path Extend the storage location in Mass in the SAP:- Step 1:- Use Transaction code= MMSC_MASS and execute....

-
Path Extend the storage location in Mass in the SAP:- Step 1:- Use Transaction code= MMSC_MASS and execute....
-
Assign Fields to Field Selection Groups:- This configuration allows one to make some fields optional, hidden, or mandatory in the master r...
-
-: Material is not maintained in the plant:- Error:- 👇 Step 1:-Use the transaction code :- MM01 and follow the below steps by steps. St...


